CI-CD Your Data Pipeline
Introduction
In the world of modern software development and data engineering, Continuous Integration and Continuous Deployment (CI/CD) have become indispensable practices. These methodologies not only streamline the development process but also ensure the reliability and scalability of data pipelines. In this guide, we will explore how to set up a CI/CD data pipeline using Github Actions and Amazon EC2 with Docker.
When venturing into data pipeline development, one encounters a myriad of tools and frameworks catering to diverse needs. Options range from Apache Airflow for orchestrating complex workflows to Kafka and Pyspark for real-time data processing.
Among these, Flask emerges as a versatile choice, not only for event-driven data pipelines but also for lightweight web applications. Hence, this blog will showcase a demonstration of CI/CD implementation using Flask and React for a dynamic, responsive web interface alongside data pipeline orchestration, providing a comprehensive illustration of modern development practices in action.
Why Docker?
With the use of Docker containers, we ensure consistency across different environments, making it easier to package and deploy our data pipeline components. By encapsulating our dependencies and environment configurations within Docker images, we can achieve reproducible builds and deployments, regardless of the underlying infrastructure.
GitAction overview
Automate, customize, and execute your software development workflows right in your repository with GitHub Actions. You can discover, create, and share actions to perform any job you’d like, including CI/CD, and combine actions in a completely customized workflow.
To create an Action, Navigate to repo UI / Actions or create yourActionFile.yml in .github/workflows/
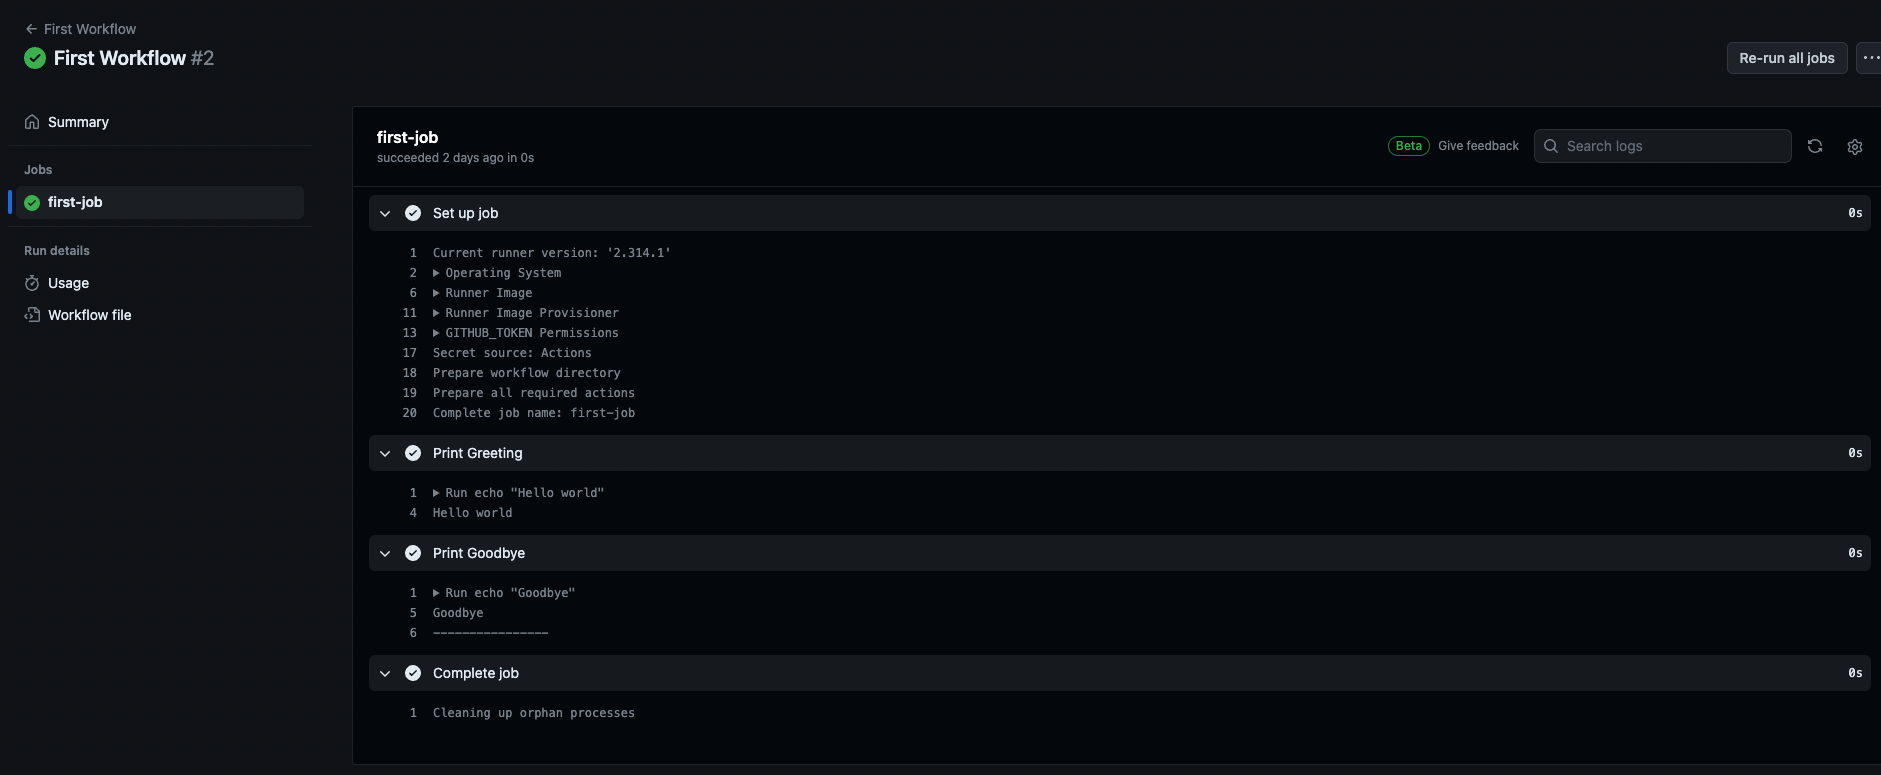
Sample Github actions
1
2
3
4
5
6
7
8
9
10
11
12
name: First Workflow # Workflow name
on: workflow_dispatch  # manually triger workflow (https://docs.github.com/en/actions/using-workflows/events-that-trigger-workflows#workflow_dispatch)
jobs:
  first-job: # Job name
    runs-on: ubuntu-latest # OS to run your actions (Can be linux, Ubuntu,...)
    steps:
      - name: Print Greeting # step name
        run: echo "Hello world" # command
      - name: Print Goodbye
        run: |
          echo "Goodbye"
          echo "----------------"
The output when trigger that action on UI:
Demo-react-cicd
Demo-react-cicd Overview:
- Check out code on GitHub Action CD.
- Install Node.js.
- Install npm packages.
- Run tests.
1
2
3
4
5
6
7
8
9
10
11
12
13
14
15
16
17
18
19
name: Demo react cicd
on: push # event type
jobs:
  test:
    runs-on: ubuntu-latest
    steps:
      - name: Get code from repo # get code from repo to github servers
        uses: actions/checkout@v4 # https://github.com/marketplace/actions/checkout # we could use with
      - name: Install NodeJS
        uses: actions/setup-node@v4
        with:
          node-version: 18
      - name: Install dependencies
        working-directory: ./demo-react-cicd
        run: npm install
      - name: Run tests
        run: |
          cd demo-react-cicd
          npm test
CICD Pipelines with Flask, Docker and AWS EC2
Flask Project CICD Overview:
- Use Docker to run the server.
- Create an EC2 instance.
- CI: Use GitHub Actions server to build the image and push it to DockerHub.
- CD: Use a self-hosted server like EC2 to pull the image from DockerHub and build the container.
Dockerfile for Flask:
1
2
3
4
5
6
7
8
9
10
11
12
13
14
15
FROM python:3.11

# Expose the port
EXPOSE 5000

# Set up working directory
WORKDIR /app

COPY ./requirements.txt requirements.txt

RUN pip3 install -r requirements.txt

COPY . .

CMD [ "python3", "-m" , "flask", "run", "--host=0.0.0.0"]
1. Docker CI pipeline
Build docker image via Dockerhub
1
2
3
4
5
6
7
8
9
10
11
12
13
14
15
16
17
18
19
20
21
22
23
24
25
name: CI Pipeline # To build docker image with push event

on:
  push:
    branches:
      - production

jobs:

  build:

    runs-on: ubuntu-latest

    steps:
    - uses: actions/checkout@v3
    - name: Login Dockerhub
      env:
        DOCKER_USERNAME: ${{secrets.DOCKER_USERNAME}}
        DOCKER_PASSWORD: ${{secrets.DOCKER_PASSWORD}}
      run: docker login -u $DOCKER_USERNAME -p $DOCKER_PASSWORD

    - name: Build the Docker image # build imange
      run: docker build -t katoo2706/flask-python-api .
    - name: Push to Dockerhub # push to dockerhub for katoo2706 account
      run: docker push katoo2706/flask-python-api:latest
Used secret variables: DOCKER_USERNAME, DOCKER_PASSWORD are used to log in DockerHub. You can create secret by visiting Repo UI and create secrets on Repo settings.
The ci pipeline will push image with tag latest
1
docker push katoo2706/flask-python-api:latest
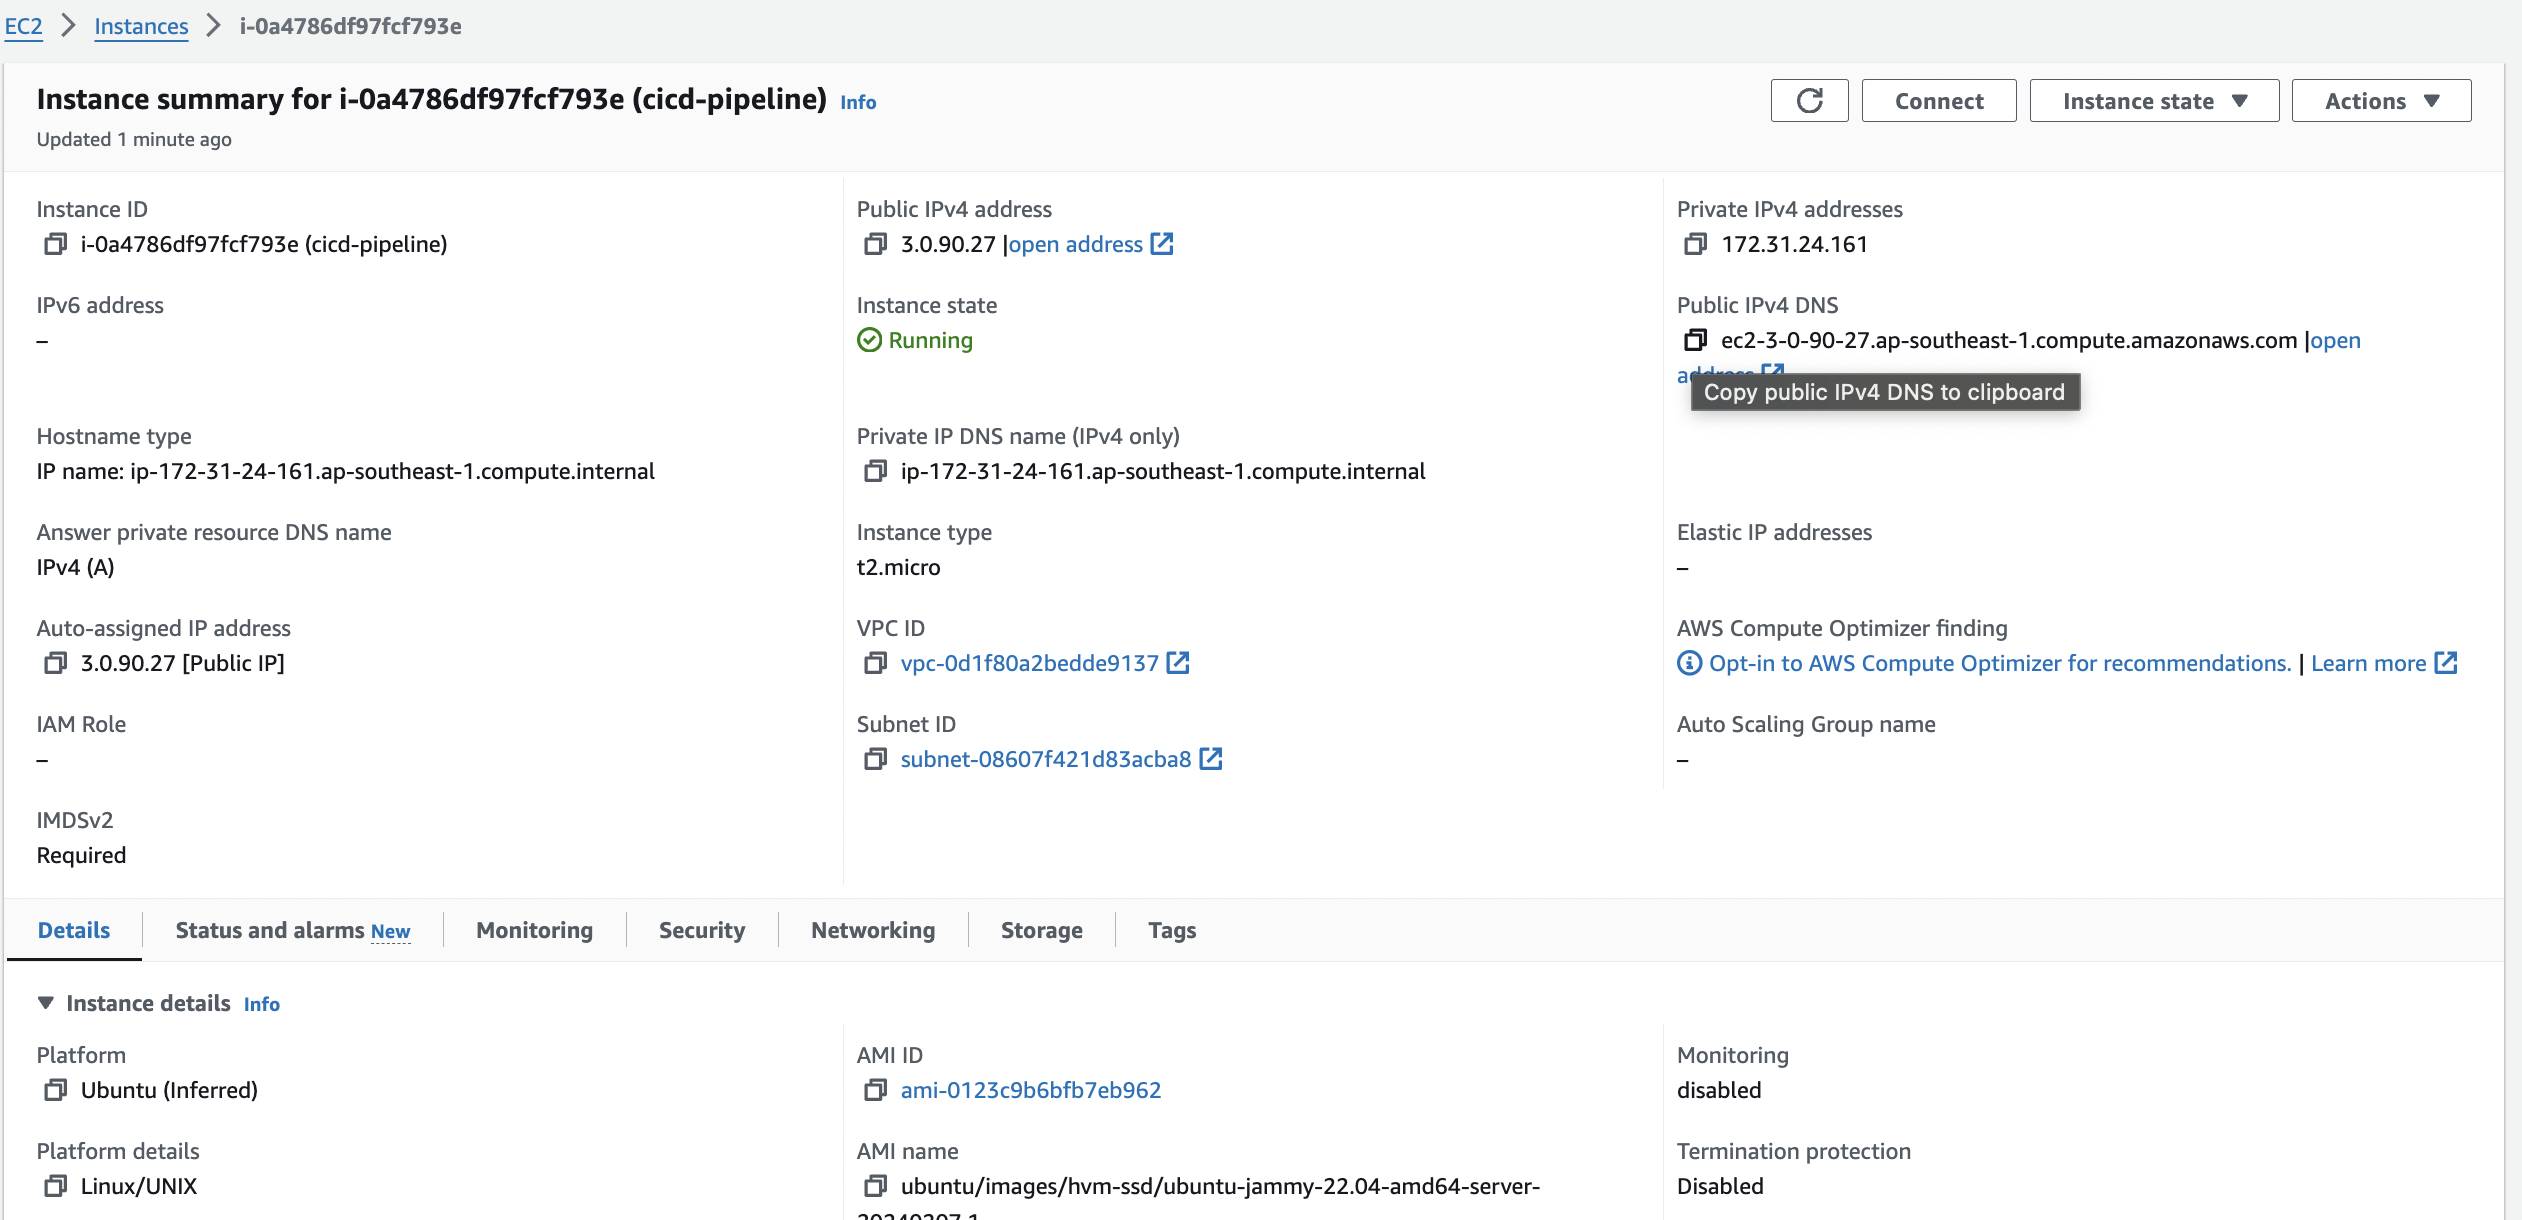
2. Create EC2 instance
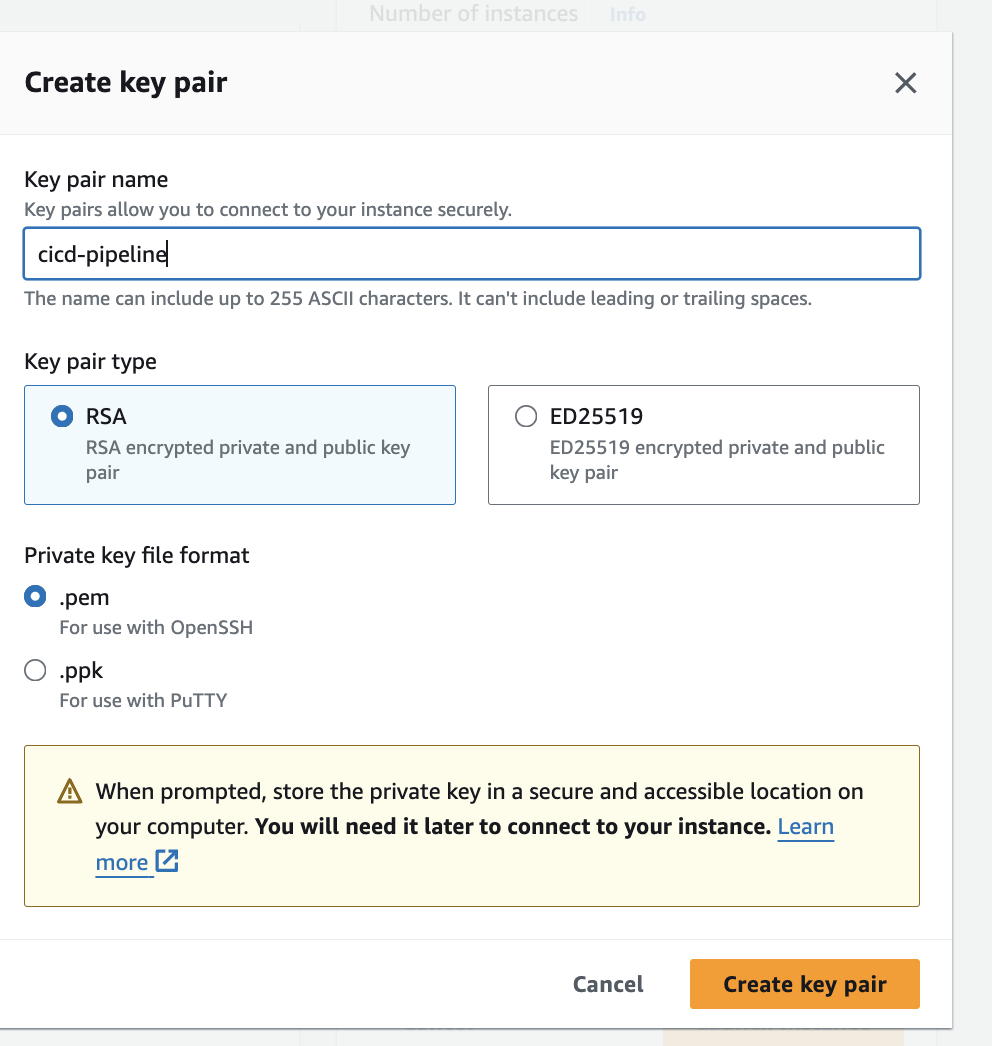
Create key pair when for EC2, and save key pair as .../DEVOPS/aws-key-pair/cicd-pipeline.cer
Please note that you should allow access from anywhere and access the EC2 instance via SSH. This can be sorted out when you create the instance and choose the security group.
3. Access EC2 instance via SSH
Access via ssh
1
2
3
chmod 400 "..../cicd-pipeline.cer"

ssh -i "..../cicd-pipeline.cer" [email protected]
Use root cmd
1
2
3
4
5
6
7
8
9
10
# Switch to superuser (root) account
sudo su

# Update package lists
sudo apt update

# Upgrade installed packages without requiring manual confirmation
sudo apt-get upgrade -y

exit
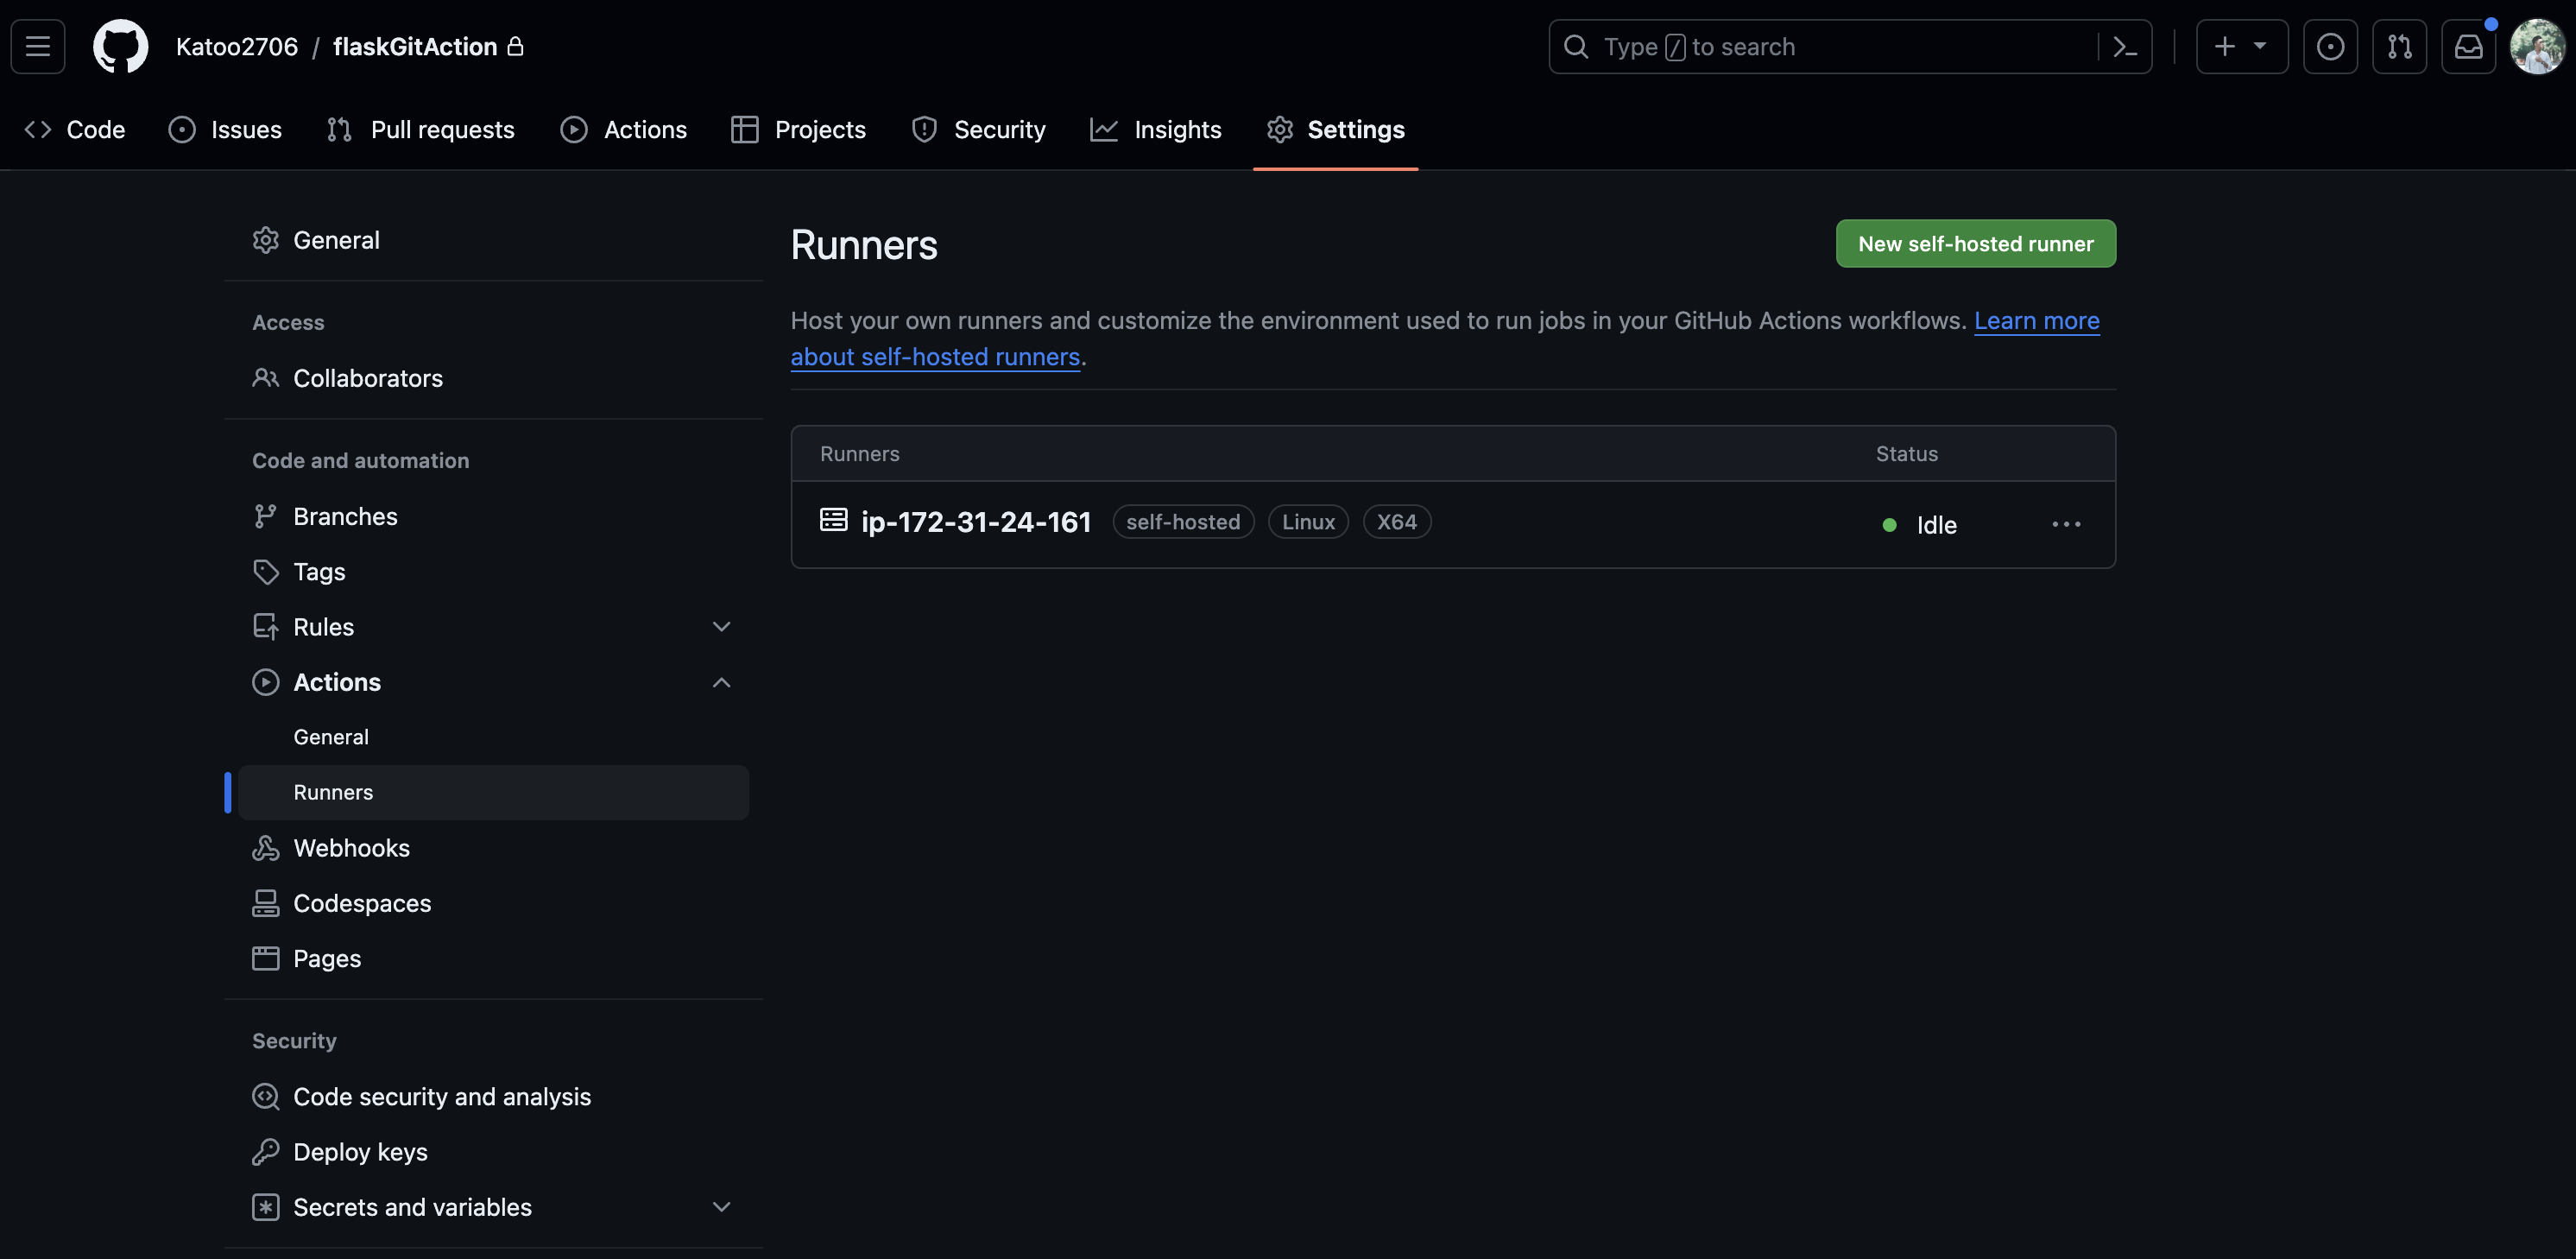
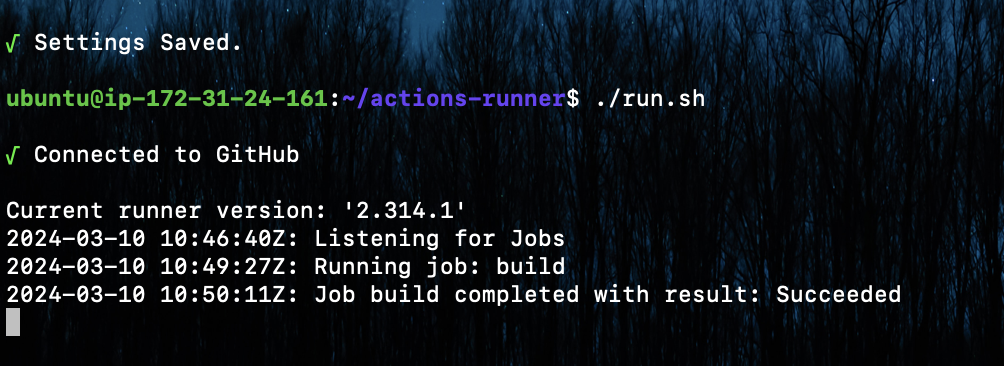
4. Create self-hosted runner for Github actions (via EC2 instance)
Create self-hosted runner
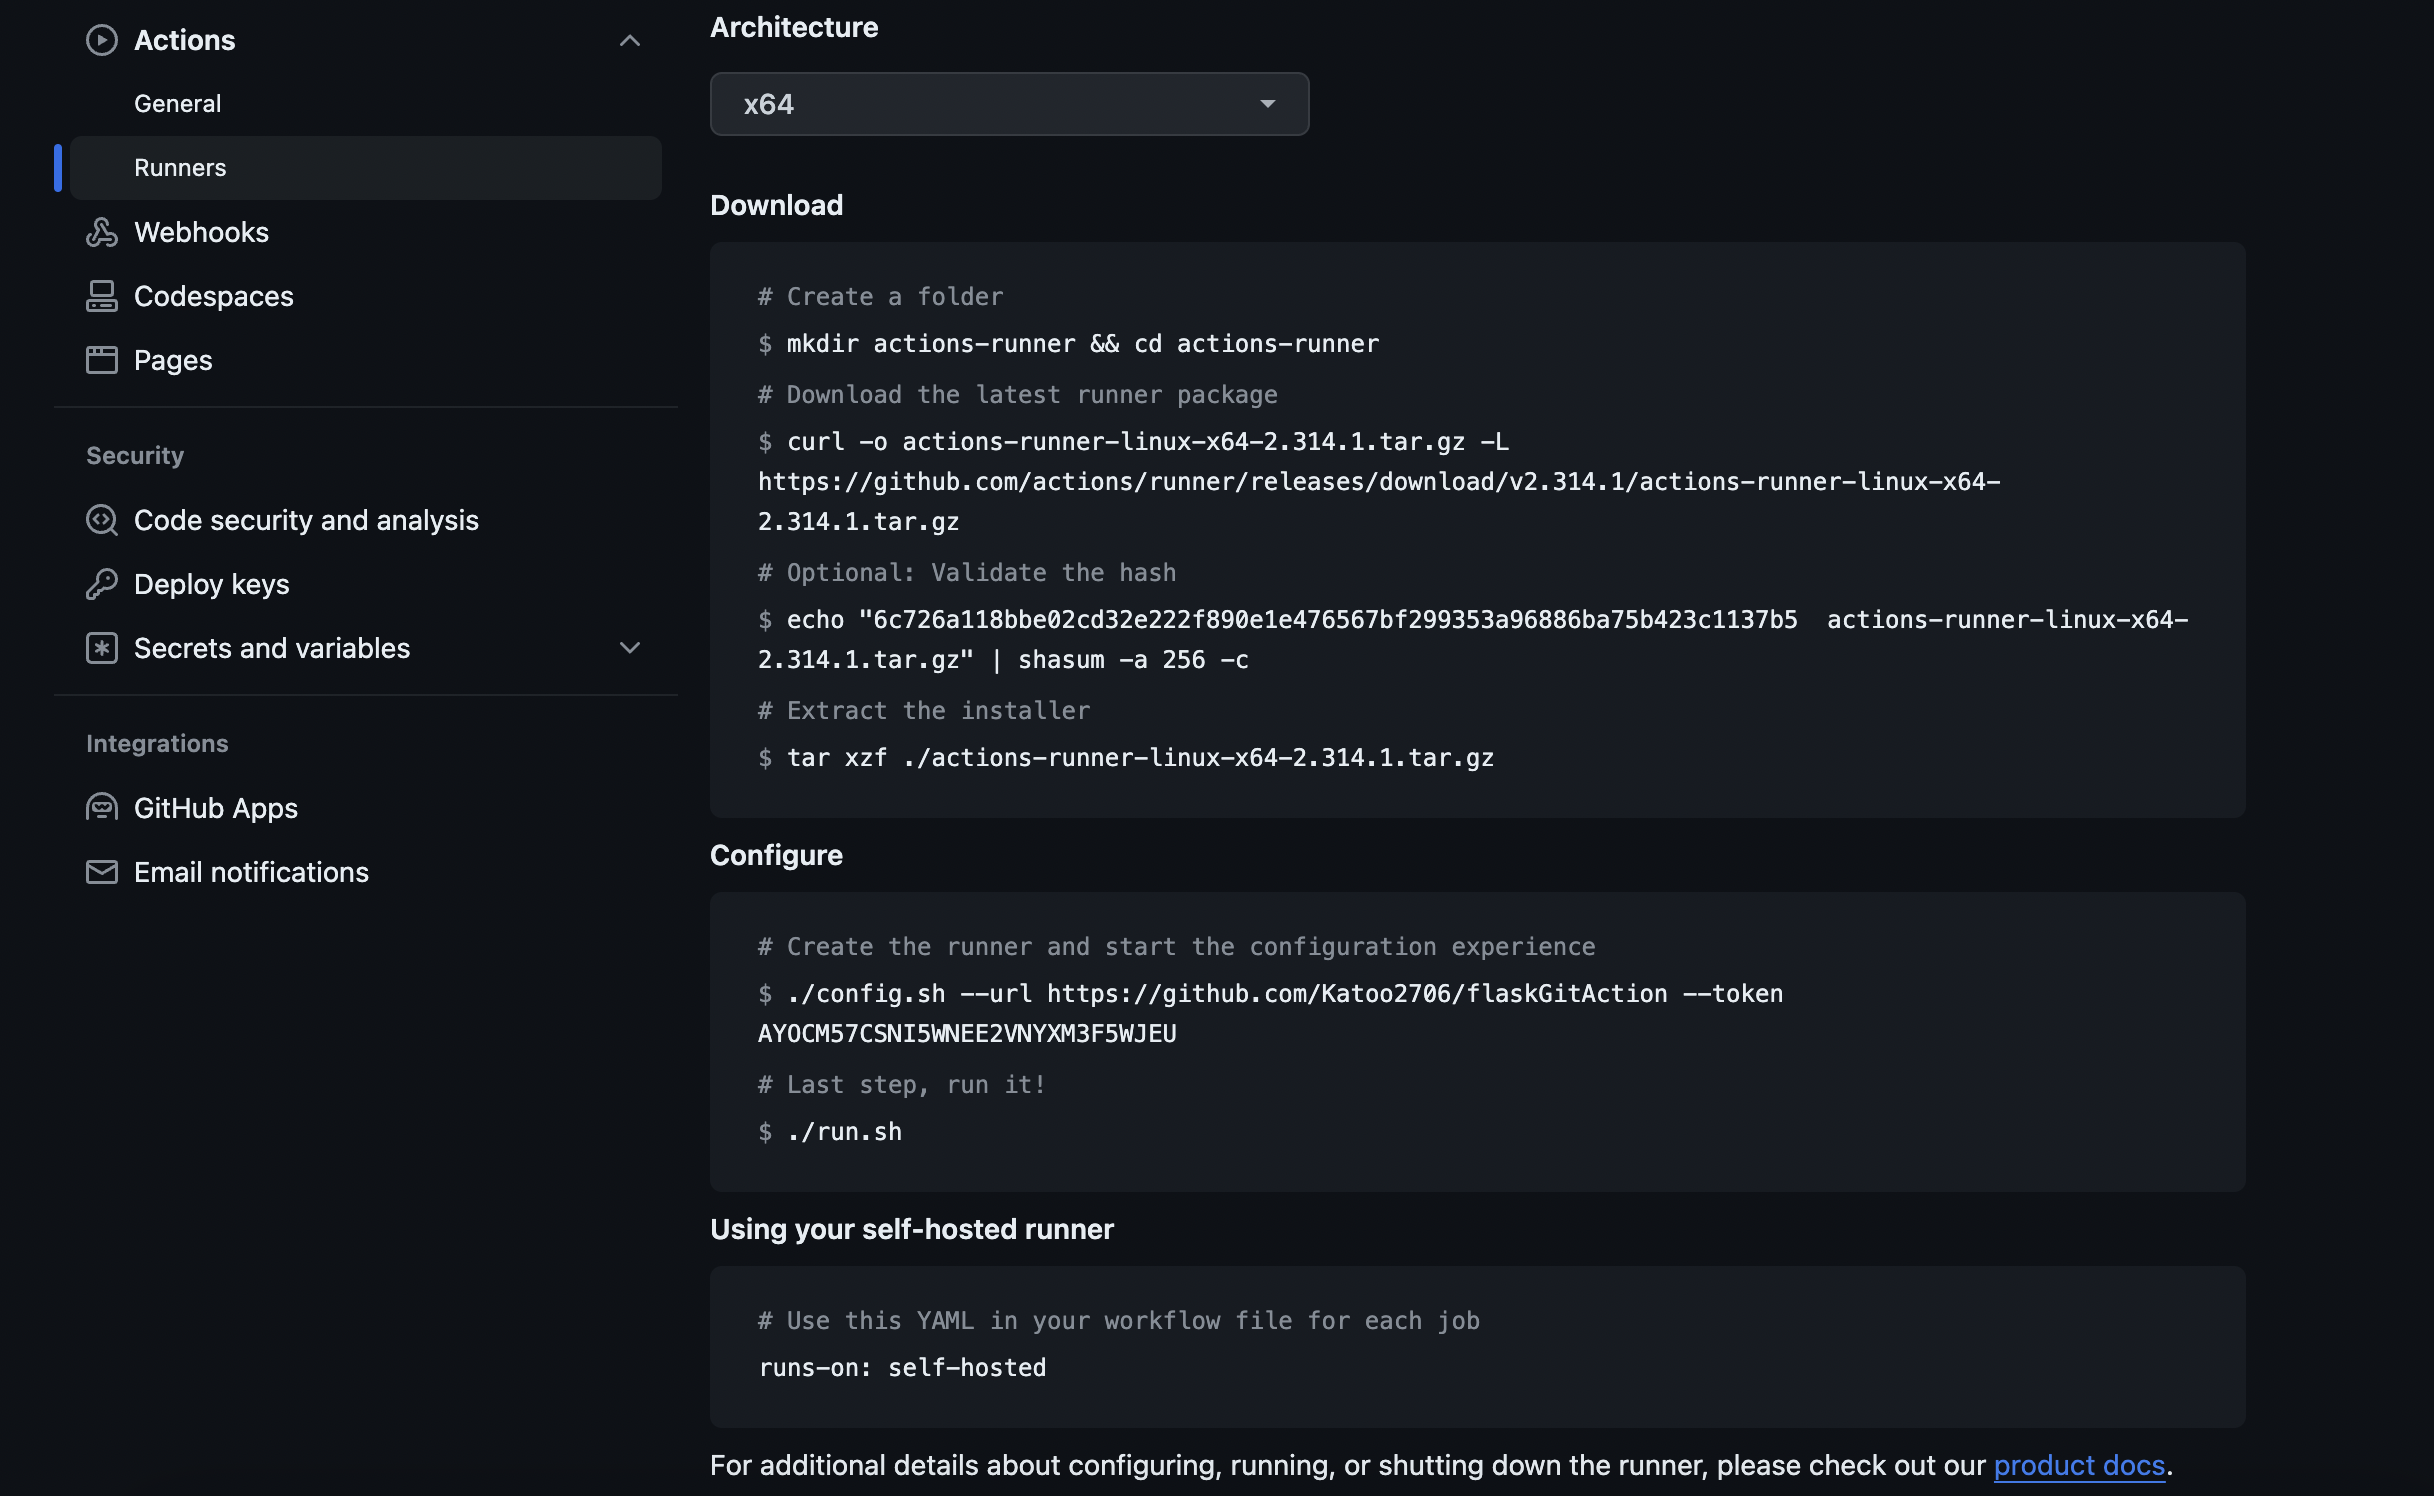 Run all the command to initial self-hosted runner (must be executed without sudo), by using
 exit command that I’ve used before.
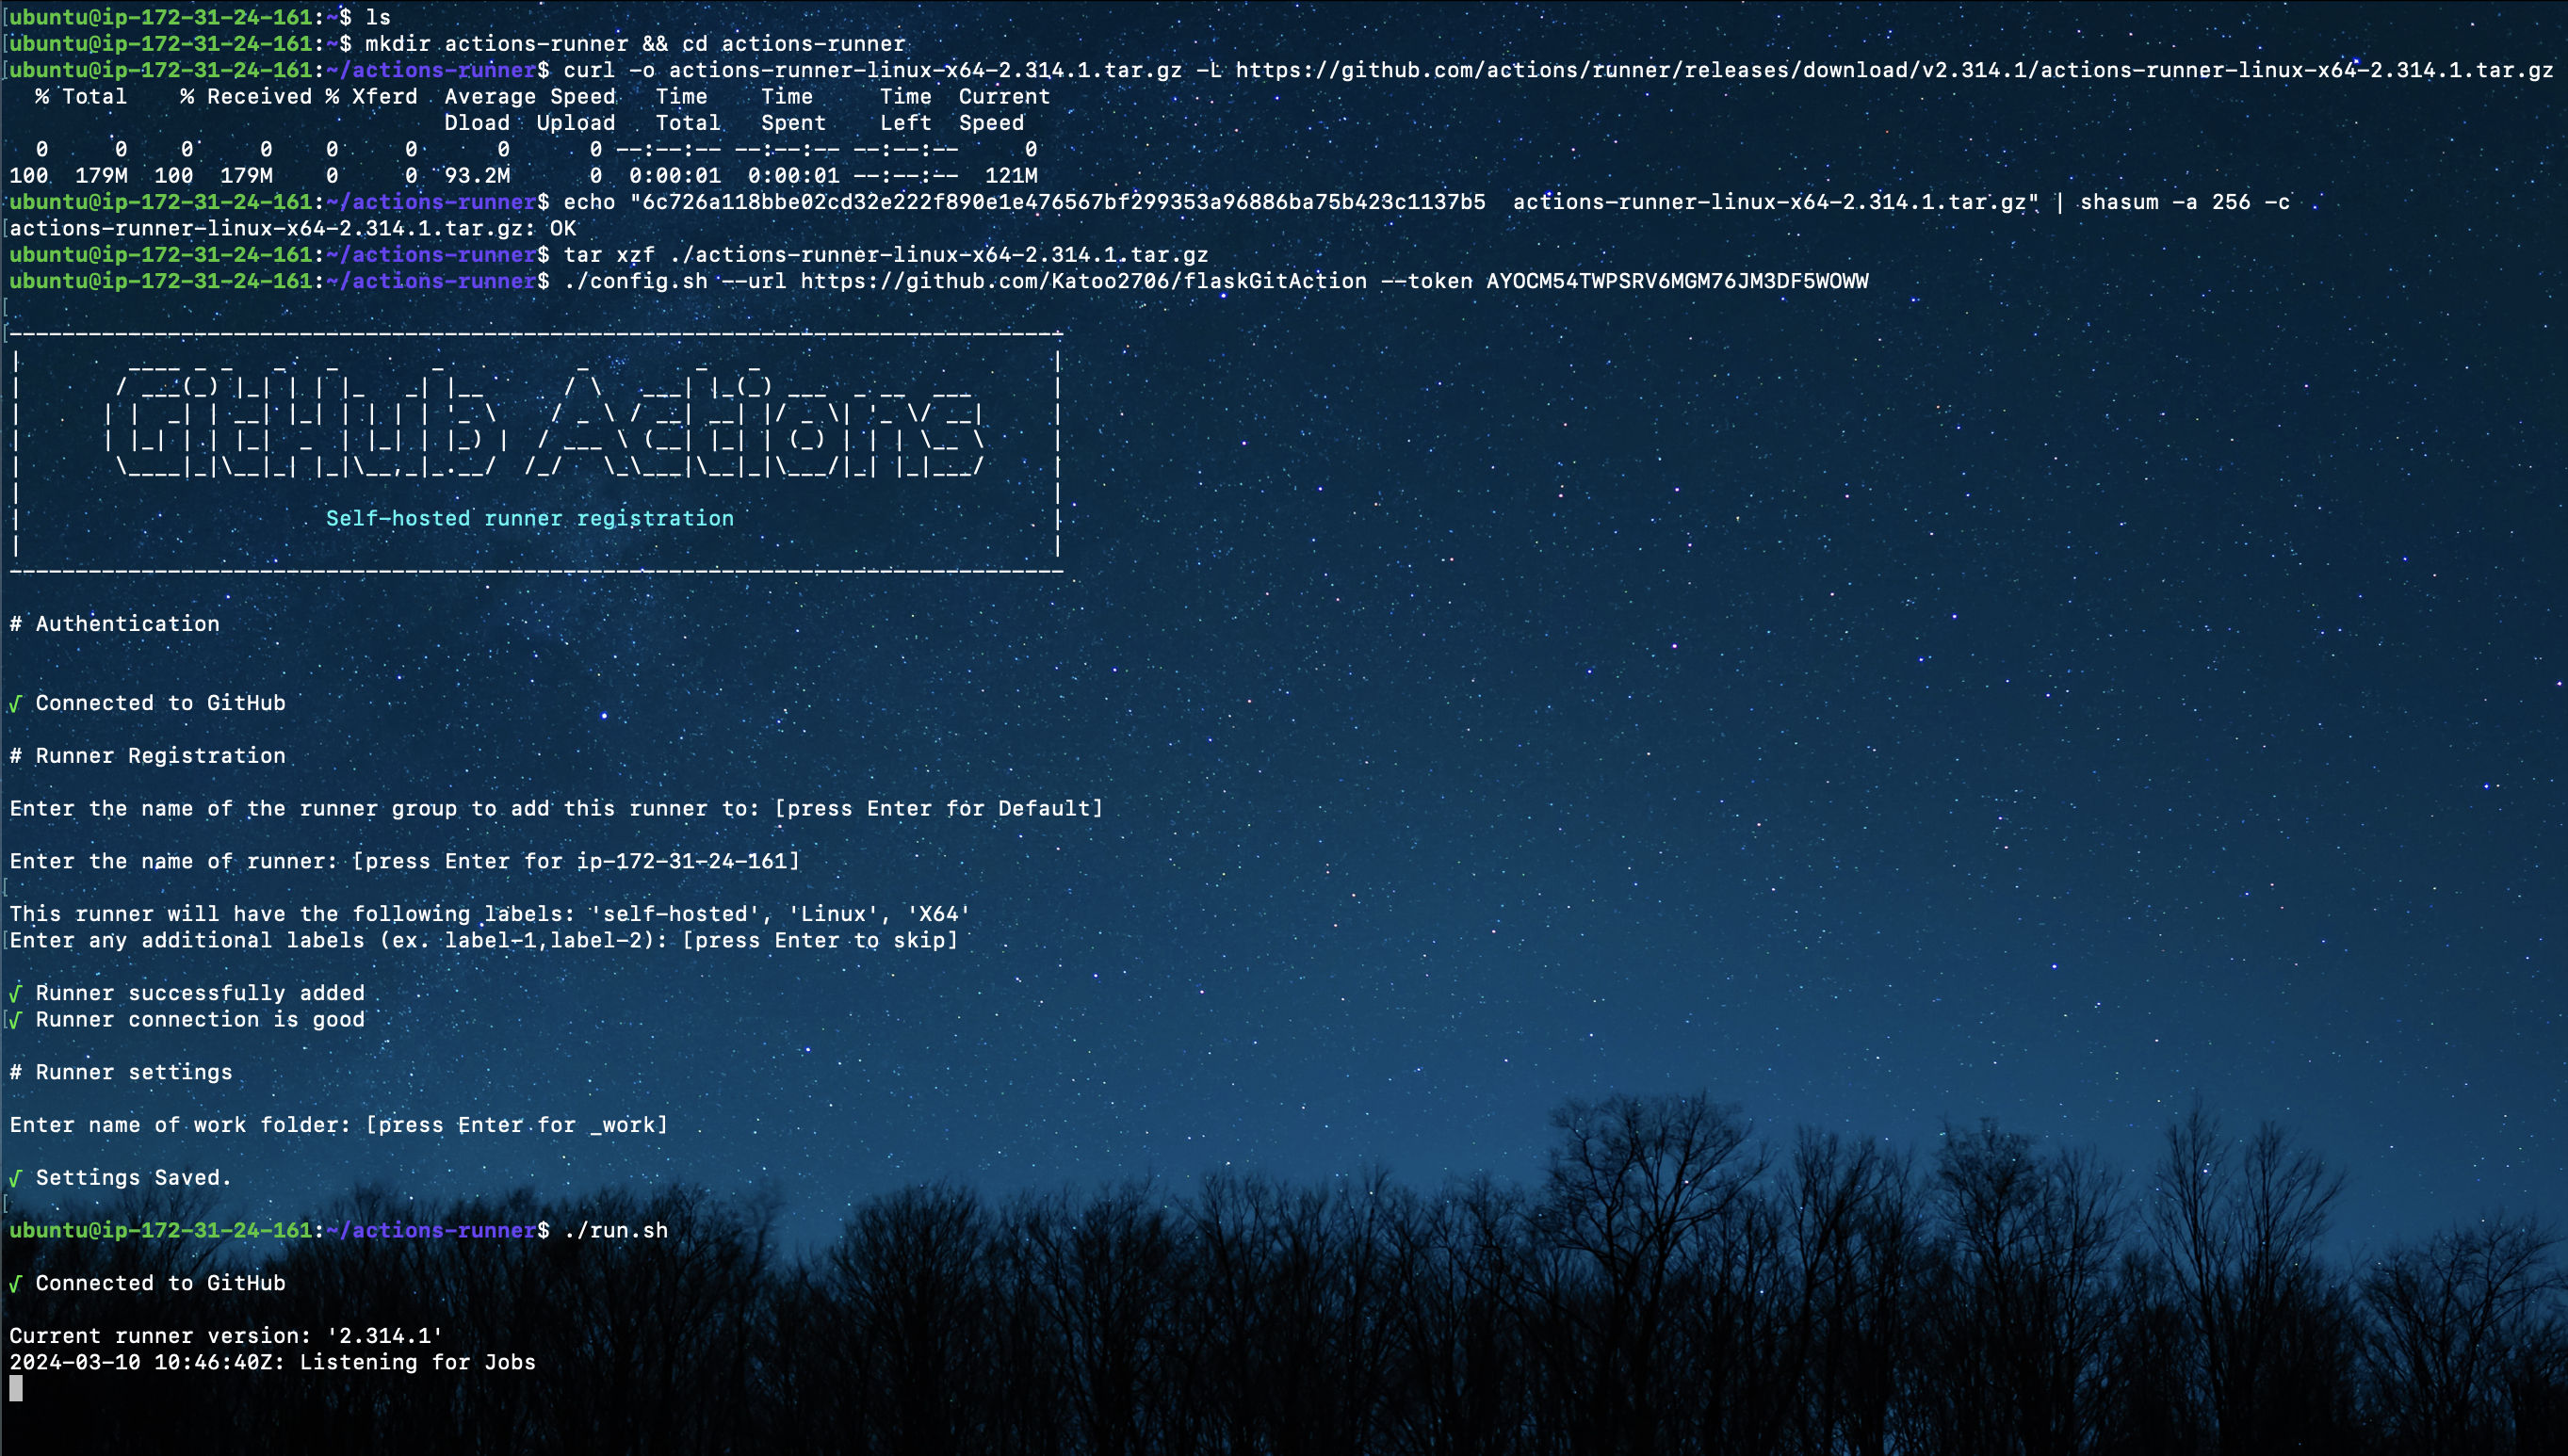
After that, we can see the runner in Github actions setting
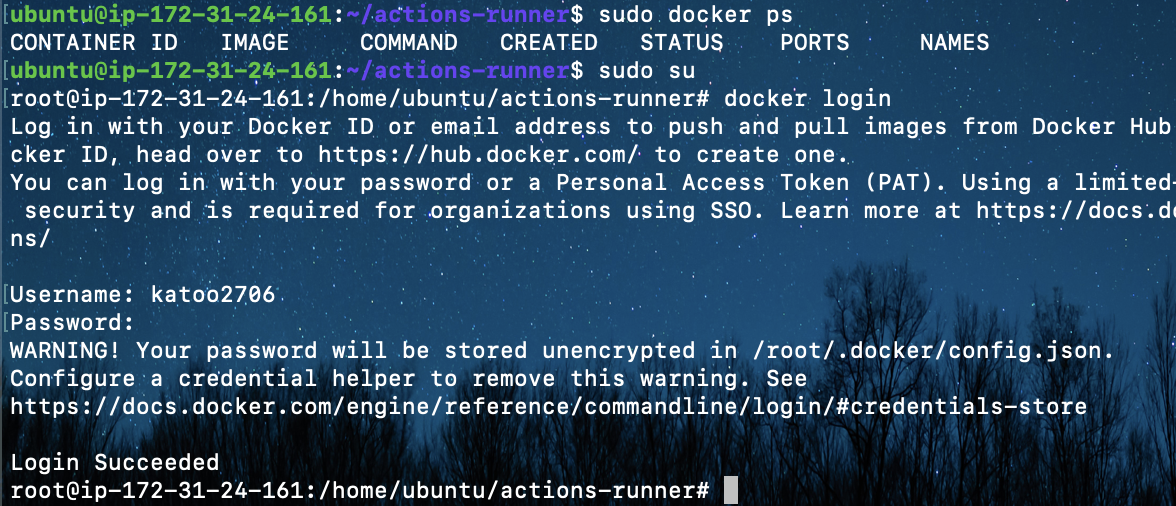
5. Install docker packages on Ubuntu and login to Docker
1
2
3
4
5
6
7
8
9
10
11
12
13
14
15
16
17
18
19
20
21
22
23
24
# Install docker / docker compose
# https://docs.docker.com/engine/install/ubuntu/
sudo apt-get install ca-certificates curl
sudo install -m 0755 -d /etc/apt/keyrings
sudo curl -fsSL https://download.docker.com/linux/ubuntu/gpg -o /etc/apt/keyrings/docker.asc
sudo chmod a+r /etc/apt/keyrings/docker.asc

# Add the repository to Apt sources:
echo \
  "deb [arch=$(dpkg --print-architecture) signed-by=/etc/apt/keyrings/docker.asc] https://download.docker.com/linux/ubuntu \
  $(. /etc/os-release && echo "$VERSION_CODENAME") stable" | \
  sudo tee /etc/apt/sources.list.d/docker.list > /dev/null
sudo apt-get update

# Install the Docker packages.
sudo apt-get install docker-ce docker-ce-cli containerd.io docker-buildx-plugin docker-compose-plugin

# Health check
sudo docker run hello-world

# login docker
sudo sudo

docker login
6. Run CD pipeline after CI pipeline
We can:
- Run docker compose via docker image which is pulled from Dockerhub
- Run docker-compose command with the new image updated or with new code changed
1
2
3
4
5
6
7
8
9
10
11
12
13
14
15
16
17
18
19
20
21
name: CD Pipeline

on:
  workflow_run:
    workflows: ["CI Pipeline"]
    types:
      - completed

jobs:

  build:

    runs-on: self-hosted

    steps:
    - name: Pull Docker image
      run: sudo docker pull katoo2706/flask-python-api:latest # pull latest image from CI process
    - name: Delete Old docker container
      run: sudo docker rm -f cicd-pipeline-container || true
    - name: Run Docker Container # Otherwise, we can use sudo docker-compose up -d
      run: sudo docker run -d -p 5000:5000 --name cicd-pipeline-container katoo2706/flask-python-api
Now you can check the log for CD pipeline
7. Install Nginx as reverse proxy sever for HTTP/HTTPS request
Install Nginx
1
2
3
sudo su

sudo apt install nginx
Get docker container ip address
1
2
3
4
5
docker inspect -f \
'{{range .NetworkSettings.Networks}}{{.IPAddress}}{{end}}' \
<docker_id>

# see in sudo docker ps

Edit nginx default file
1
2
3
cd /etc/nginx/sites-available/

nano default
 Add proxy pass to location:
 proxy_pass http://172.17.0.2:5000;
Restart nginx
1
systemctl restart nginx
8. Final step
After install Nginx, you can visit IP4 DNS from server.